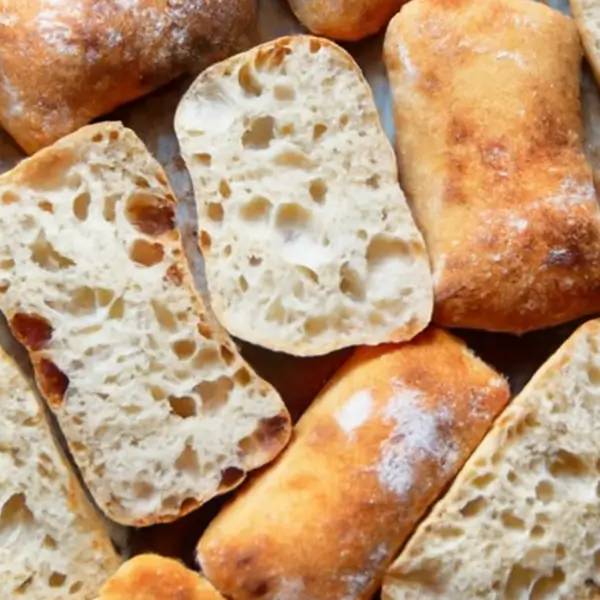

Baking homemade Simple Sourdough Ciabatta Bread is a rewarding experience that brings the aroma of fresh bread into your home without the complexity often associated with sourdough. Whether you’re a beginner or an experienced baker, this straightforward recipe promises a light, airy crumb and a crisp, golden crust—without requiring special equipment like a Dutch oven or a baking stone. With just four simple ingredients and a bit of patience, you’ll have a loaf that’s perfect for sandwiches, bruschetta, or just enjoying with a drizzle of olive oil. Ready to master this deliciously simple ciabatta? Let’s get started!
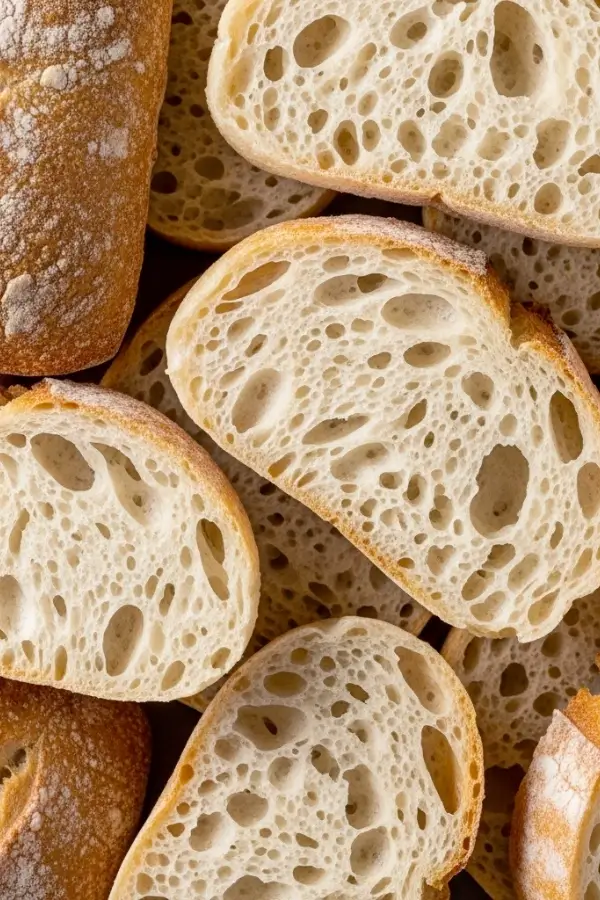
Table of Contents
Why This Recipe Stands Out: Simplicity Meets Sourdough Excellence
This Simple Sourdough Ciabatta Bread recipe is all about ease without compromising on flavor or texture. Whether you’re a novice or a seasoned baker, here’s why you’ll love this approach:
- Minimal Kneading: With no heavy mixing or kneading required, this recipe is perfect for those who want homemade sourdough without the workout.
- No Special Equipment Needed: Forget about complicated tools! A sheet pan, parchment paper, and a few basic utensils are all you need.
- Perfect for Beginners: Even if you’ve never baked sourdough before, this recipe guides you through every step, ensuring success from the first try.
- Authentic Texture & Flavor: Achieve that delightful, airy crumb and a golden, crispy crust—everything you expect from ciabatta, made simply at home.
No more sticky dough struggles! Unlike traditional recipes that can leave you battling with overly wet dough, this one helps you achieve that ideal consistency with minimal effort. Plus, it guarantees an open, honeycomb-like crumb without needing a complicated preferment or a Dutch oven.
Whether you’re using it to craft a delicious sandwich or enjoying it on its own with olive oil, this ciabatta will quickly become a favorite in your kitchen!

How to Cook Tomahawk Scorpion Steak Like a Pro
- Total Time: 45 minutes
- Yield: 4 people 1x
Description
Discover the secret to the perfect Tomahawk Scorpion Steak. Get expert tips, seasoning tricks, and grilling techniques. Start cooking like a pro!
Ingredients
- 2–3 Tomahawk Steaks
- 1.5 tbsp Kosher Salt
- 1.5 tbsp Black Pepper
- 1.5 tbsp Garlic Powder
- Olive Oil (as needed)
- 3–4 Rosemary Sprigs
- 3–4 Thyme Sprigs
- 3–4 Crushed Garlic Cloves
- 2–3 tbsp Unsalted Butter
- 1/4 cup Unsalted Butter, melted
- 1.5 tbsp Chopped Parsley
- Kosher Salt (to taste)
Instructions
- In a bowl, mix together all the ingredients for the finishing butter and set aside.
- Slather room-temperature steaks with beef tallow; season generously with salt, pepper, and garlic powder.
- Preheat grill to 400°F for direct cooking.
- Grill steaks 15–20 min, flipping occasionally, until they reach 110°F internal.
- Remove and rest 10 min.
- Preheat oven (or broiler) to 500°F.
- Place rested steaks in a skillet with unsalted butter, smashed garlic, thyme, and rosemary; broil 3–4 min until butter sizzles.
- Top each steak with finishing butter.
- Rest 2 min more, slice, serve, and enjoy!
Notes
– Use an active sourdough starter from King Arthur Flour or Breadtopia for best results.
– Bread flour is ideal for this recipe; however, all-purpose flour will work in a pinch.
– You can skip the Dutch oven for baking and still achieve a crispy crust by baking directly on a sheet pan.
- Prep Time: 15 minutes
- Cook Time: 30 minutes
- Category: Dinner
- Method: Reverse Sear Grill
- Cuisine: American
Nutrition
- Calories: 407
- Sugar: 0.1
- Sodium: 2681
- Fat: 33
- Saturated Fat: 18
- Unsaturated Fat: 13
- Trans Fat: 1
- Carbohydrates: 5
- Fiber: 1
- Protein: 24
- Cholesterol: 114
Understanding Ciabatta: History, Characteristics, and Sourdough’s Role
What is Ciabatta?
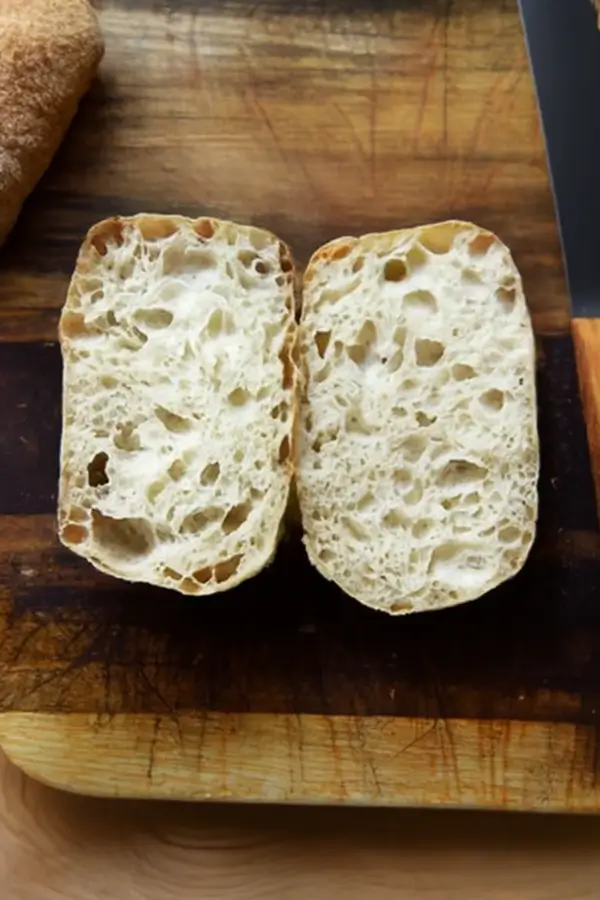
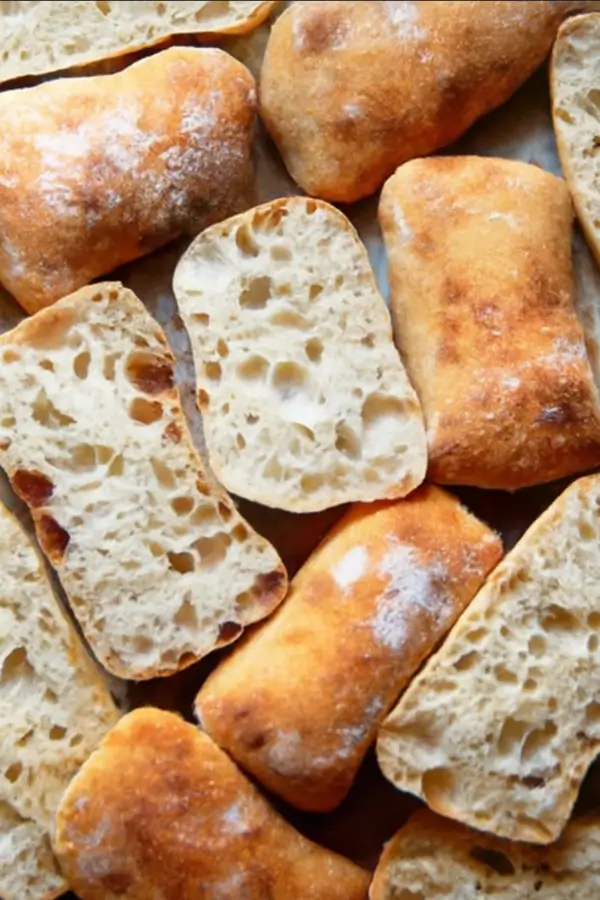
Ciabatta, meaning “slipper” in Italian, is an iconic Italian bread, renowned for its rustic look and distinct texture. Originating from the northern region of Italy, this bread is characterized by its irregular shape and airy, open crumb. The thin, crisp crust contrasts beautifully with the soft, chewy inside, creating a delightful combination of textures. While often used for making sandwiches, ciabatta’s mild flavor and delicate texture also pair wonderfully with oils, cheeses, or simply on its own.
Traditional vs. Sourdough Ciabatta
Traditional ciabatta recipes typically use yeast for leavening, resulting in a quicker rise and a slightly different flavor. This sourdough ciabatta, however, uses a natural sourdough starter, which enriches the bread with a more complex, tangy flavor. The fermentation process with wild yeast and bacteria gives the bread its characteristic taste and open, airy structure, which is harder to achieve with commercial yeast.
The sourdough version of ciabatta takes a bit longer, but it adds a level of flavor and texture that’s unmatched. While traditional ciabatta can be delicious, the use of a sourdough starter makes for a much richer, more flavorful bread that’s both chewy and light.
The Science Behind Sourdough
Sourdough relies on a natural fermentation process where wild yeast and bacteria in the starter help the dough rise. The yeast ferments the sugars, while the bacteria produce acids that enhance the flavor, making the bread subtly tangy. The slow fermentation process also strengthens the dough, creating the airy crumb typical of ciabatta. Additionally, this method allows for better flavor development, making sourdough ciabatta a step up from traditional versions.
Essential Ingredients: Quality & Purpose
The secret to perfect Simple Sourdough Ciabatta Bread lies in using the right ingredients in the right proportions. Here’s a breakdown of what you’ll need and why each ingredient plays a crucial role in achieving that light, airy, and flavorful ciabatta.
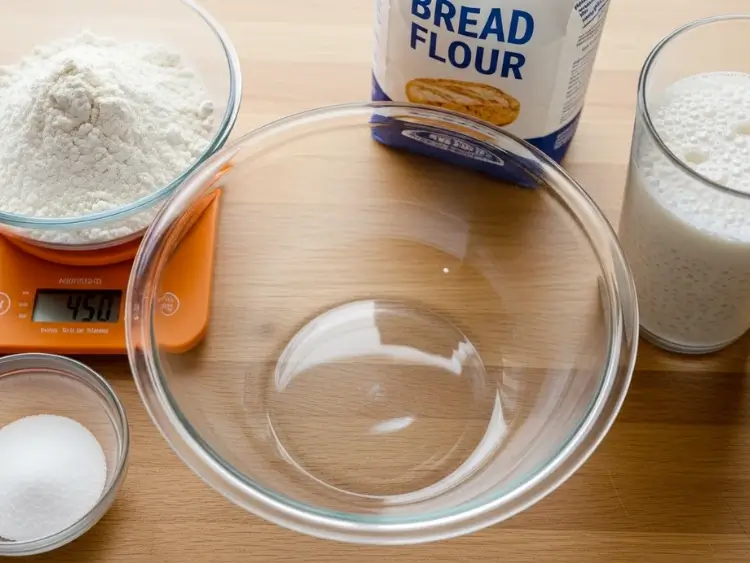
Ingredients List:
- 360 grams (about 1.5 cups) of Water: Warm water is used to dissolve the salt and activate the sourdough starter. It’s important to avoid water that’s too hot, as it can damage the yeast in the starter. A comfortable room temperature is ideal.
- 12 grams (about 2 teaspoons) of Salt: Salt not only enhances the flavor but also regulates yeast activity during fermentation, contributing to the overall texture and flavor balance of the bread.
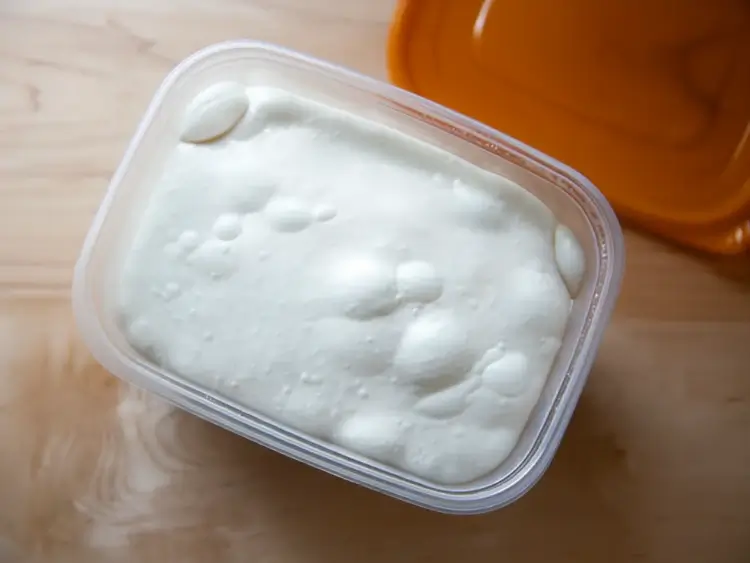
- 100 grams (about 1/2 cup) of Active Sourdough Starter: This is the key to the tangy flavor and leavening power of the bread. Be sure your starter is well-fed and bubbly for the best results. You can either use a store-bought starter (e.g., King Arthur Flour, Breadtopia) or make your own at home.
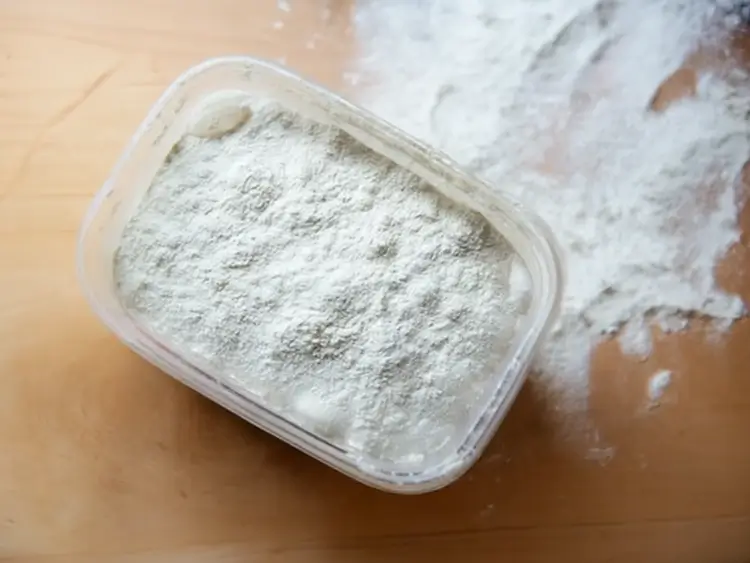
- 450 grams (about 3.5 cups) of Bread Flour: Bread flour is preferred over all-purpose flour due to its higher protein content, which gives the dough structure and helps develop gluten. The protein content ensures that the dough can hold its shape and achieve that signature airy texture.
Ingredient Deep Dive:
- Sourdough Starter: The starter is essential for this recipe as it’s responsible for both leavening the dough and contributing a unique tangy flavor. It’s important to ensure your starter is healthy and bubbly before use, so plan to feed it regularly. If you don’t have one, you can purchase a starter from reputable sources like King Arthur Flour or Breadtopia, which provide high-quality starters ready to use.
- Bread Flour: Bread flour is essential for giving ciabatta its chewy, airy texture. The high protein content helps the dough develop strong gluten networks, which trap air and create those signature large holes in the crumb. If you can’t find bread flour, you can use all-purpose flour, but the texture may be slightly less airy.
- Water & Hydration: Hydration is key in this ciabatta recipe. At 80% hydration (the ratio of water to flour), the dough will be wet and sticky but still manageable. This high hydration level is what helps achieve the open crumb and soft, chewy texture that makes ciabatta unique. Make sure the water is at room temperature—not too hot or cold—so it doesn’t negatively affect the yeast.
Recommended Equipment:
While this recipe doesn’t require any special or fancy equipment, there are a few tools that will make the process easier:
- Digital Scale: Ensuring you measure your ingredients accurately is vital for success. A digital scale allows you to get precise measurements, especially for ingredients like flour and water, where small variations can significantly affect the dough.
- Large Mixing Bowl: For mixing the dough and performing stretches and folds, a large bowl is necessary.
- Straight-Sided Vessel for Bulk Fermentation: A straight-sided vessel makes it easier to monitor the dough’s rise during bulk fermentation. The vertical walls allow you to see when the dough has expanded by 75%, helping you avoid over-fermentation.
- Sheet Pan & Parchment Paper: These are essential for shaping and baking the ciabatta rolls, ensuring they bake evenly without sticking to the pan.
- Bench Scraper: A bench scraper helps divide the dough and shape it without deflating the air bubbles inside.
Step-by-Step Guide: Crafting Your Simple Sourdough Ciabatta
Making Simple Sourdough Ciabatta Bread doesn’t have to be complicated. With just a few simple steps and some patience, you’ll create a beautiful loaf with a crisp crust and an airy, chewy interior. Let’s walk through the process together!
1. Mix the Dough
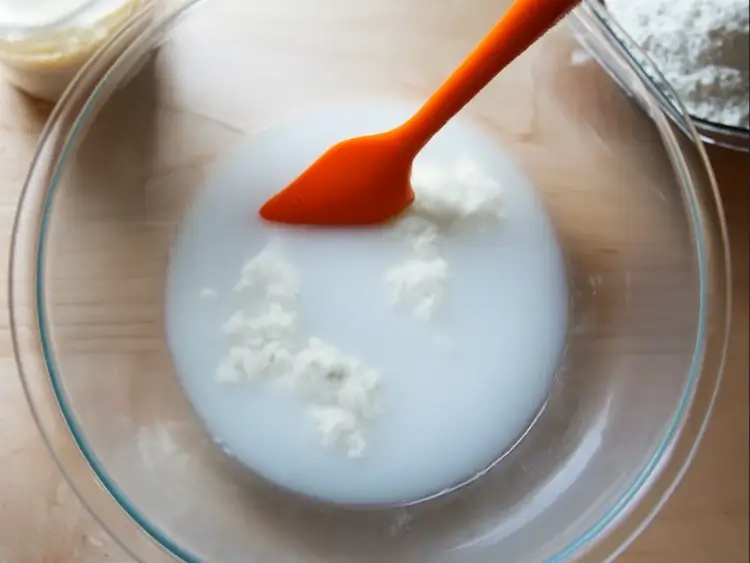
- What to do: Start by placing 360 grams of water in a large bowl. Add 12 grams of salt and stir briefly to dissolve. Then, add 100 grams of active sourdough starter and stir until incorporated.
- Why it’s important: Mixing the water, starter, and salt first ensures the ingredients are evenly distributed before adding the flour.
2. Incorporate the Flour
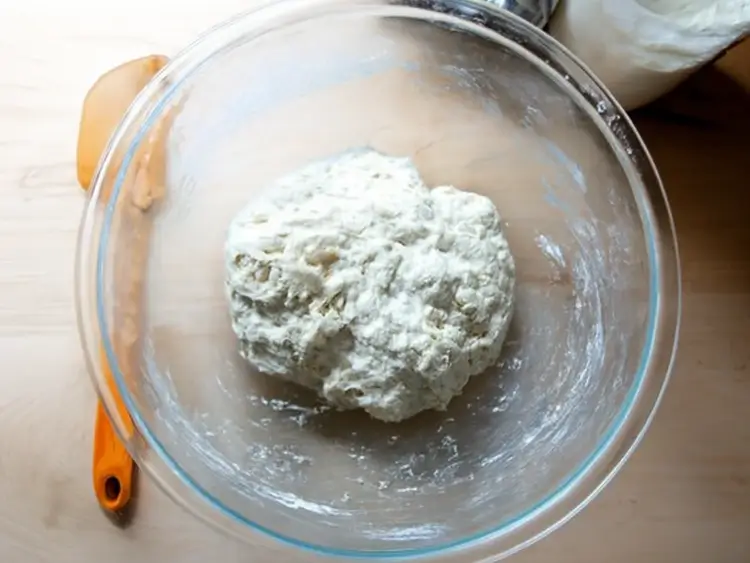
- What to do: Gradually add 450 grams of bread flour to the mixture. Stir it until a wet, sticky dough ball forms. You may need to use your hands to incorporate any remaining flour.
- Why it’s important: Properly mixing the flour into the dough is essential for achieving the right texture and consistency. The dough should be shaggy and slightly sticky but should hold together.
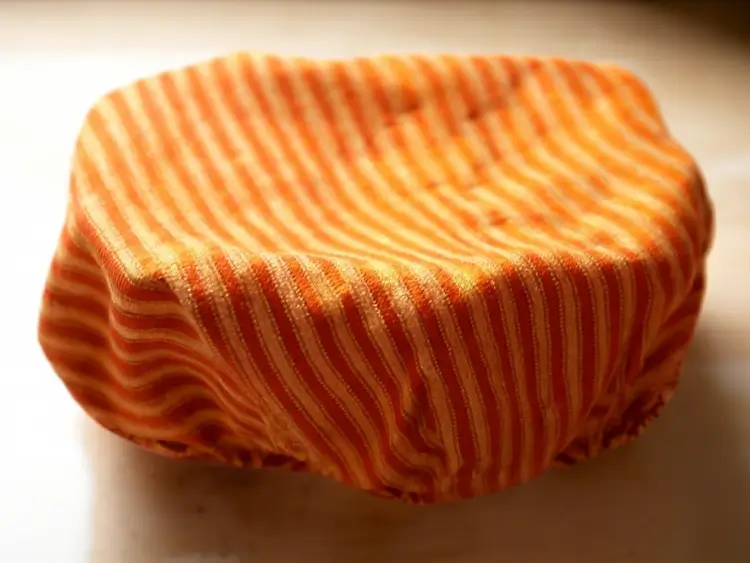
3. Perform Stretches and Folds
- What to do: Cover the bowl and let the dough rest for 30 minutes. After the resting period, wet your hands and grab one side of the dough. Pull it up and fold it toward the center. Rotate the bowl a quarter turn and repeat the process. Complete this for all sides of the dough, making a full circle. Repeat this process every 30 minutes for a total of 4 sets of stretches and folds over two hours.
- Why it’s important: The stretches and folds help develop the dough’s gluten, making it strong enough to trap air bubbles for that perfect ciabatta crumb.
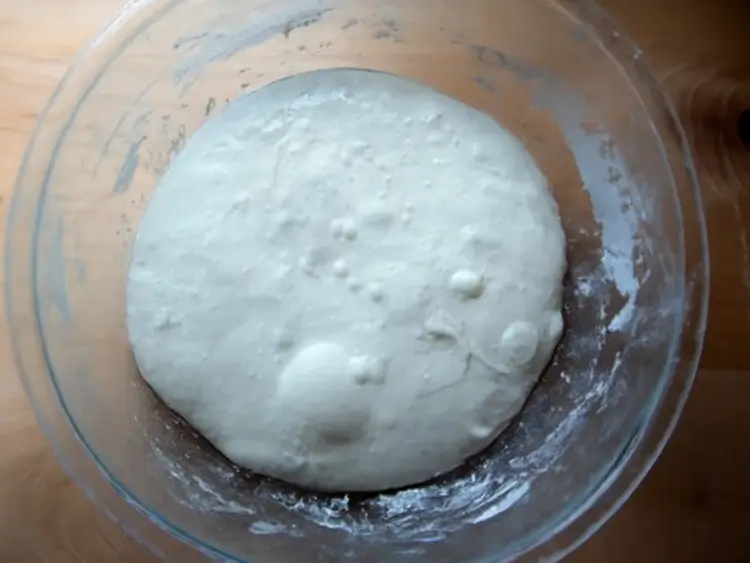
4. Bulk Fermentation (First Rise)
- What to do: After the final set of stretches and folds, transfer the dough to a straight-sided vessel. Mark the dough’s height, then cover the vessel with a towel. Let the dough rise at room temperature until it has increased in volume by about 75%. Depending on your environment and the strength of your starter, this could take around 4 hours. After the dough has risen, cover the vessel with a lid and transfer it to the fridge for 12-24 hours.
- Why it’s important: Bulk fermentation is where the dough develops its structure and flavor. The cold fermentation helps enhance the taste, resulting in a more flavorful bread.
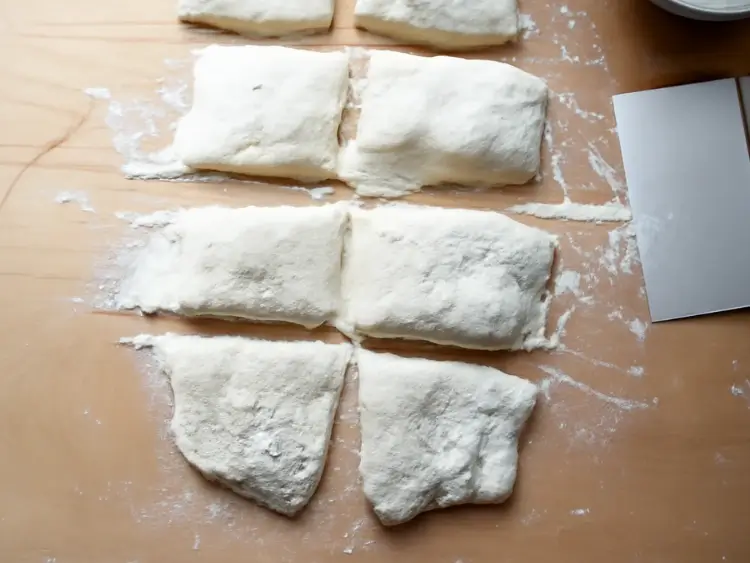
5. Shape the Dough
- What to do: When ready to bake, remove the dough from the fridge. Dust the dough and your work surface with flour. Turn the dough out onto the floured surface and gently pat it into a rectangle shape. Use a bench scraper to divide the dough into 8 small rectangles.
- Why it’s important: Handling the dough gently helps preserve the air pockets formed during fermentation. Shaping the dough correctly ensures that the rolls will bake evenly.
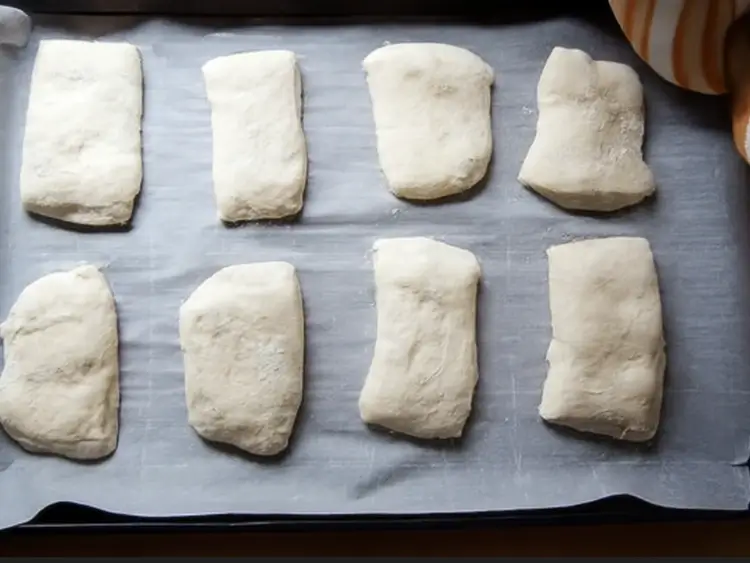
6. Rest the Dough
- What to do: Place the portions of dough onto a parchment-lined sheet pan. Let the dough rest for about an hour, covered with a towel. The dough will slightly puff up during this time.
- Why it’s important: This final rest allows the dough to relax and expand, ensuring a light, airy texture when baked.
7. Bake the Ciabatta
- What to do: Preheat your oven to 475°F (245°C). Transfer the pan with the dough to the oven and bake for 10 minutes. After 10 minutes, reduce the temperature to 450°F (230°C) and bake for an additional 10 minutes. The ciabatta should have a golden-brown crust when done.
- Why it’s important: Starting with a higher temperature helps create a crispy, flavorful crust, while lowering the temperature ensures the inside cooks through without burning.
8. Cool the Bread
- What to do: Once the ciabatta is baked, remove it from the oven and transfer it to a cooling rack. Let it cool for at least 20 minutes before slicing into it.
- Why it’s important: Cooling the bread allows the crumb to set and the flavors to fully develop. Cutting it too soon can result in a dense or gummy texture.
Beyond the Loaf: Serving, Storage, and Creative Variations
While Simple Sourdough Ciabatta Bread is delicious on its own, it’s also incredibly versatile when it comes to serving and storage. Here are a few ideas to enhance your bread experience:
Serving Suggestions:
- Sandwiches: Use ciabatta rolls as the base for a variety of sandwiches. Whether it’s a classic Italian sub with salami and provolone, or a fresh, veggie-packed option, ciabatta’s airy texture makes it the perfect choice.
- Bruschetta: Toast slices of ciabatta and top with fresh tomato, basil, garlic, and olive oil for a simple and tasty appetizer.
- With Soup or Stew: Serve ciabatta alongside your favorite soup or stew to sop up all those delicious juices. The crispy crust and soft interior are perfect for dunking!
- Olive Oil Dip: Cut the ciabatta into cubes and serve with a side of high-quality olive oil for dipping, maybe adding some balsamic vinegar for extra flavor.
Storage Best Practices:
- At Room Temperature: If you plan to eat your ciabatta within a day or two, simply store it in a paper bag or a bread box at room temperature. This will help keep the crust crisp while the inside remains soft.
- Freezing Ciabatta: To extend the shelf life, slice and freeze your ciabatta once it’s completely cool. To thaw, wrap slices in foil and heat them in the oven for a few minutes. This will refresh the crust and restore its texture.
- Avoid Plastic: While it may seem convenient, storing your ciabatta in plastic can soften the crust. If you want to keep the ciabatta fresh without sacrificing texture, opt for a bread bag or a cloth towel.
Creative Variations:
- Sourdough Ciabatta Baguettes: The same ciabatta dough can be shaped into longer, thinner baguettes. Just divide the dough into two long pieces, shape them gently, and bake them as you would the rolls. You’ll get a slightly different texture, but still that wonderful sourdough flavor.
- Herb or Cheese Infusions: You can take this basic recipe and infuse it with various flavors. Try adding herbs like rosemary or thyme to the dough during mixing, or fold in pieces of cheddar or parmesan for a cheesy twist. These additions will bring even more depth to the bread while keeping its core sourdough characteristics intact.
- Olives or Sun-Dried Tomatoes: For a Mediterranean flair, chop up some olives or sun-dried tomatoes and knead them into the dough during the mixing process. The tang of the sourdough combined with these flavorful additions creates a bread that’s perfect for snacking or as a side dish.
- Gluten-Free Adaptation (Optional): If you follow a gluten-free diet, you can try substituting gluten-free flour blends for the bread flour. Note that this may affect the texture and crumb structure, but it’s worth experimenting with a gluten-free version of ciabatta.

Troubleshooting Your Sourdough Ciabatta: Common Issues & Solutions
Even the most experienced bakers face challenges along the way, but don’t worry—troubleshooting is part of the process! Here are some common issues you might encounter while baking Simple Sourdough Ciabatta Bread and solutions to help you get it just right.
1. My dough is too sticky. What should I do?
- Possible cause: The dough may be over-hydrated or you might not have enough flour.
- Solution: If the dough is too sticky, add a small amount of flour, a tablespoon at a time, during the mixing phase. However, be careful not to add too much, as ciabatta dough is meant to be wet. For future bakes, you may want to slightly reduce the amount of water in the recipe.
2. My ciabatta is dense and not airy.
- Possible cause: Overworking the dough, insufficient fermentation, or an inactive starter.
- Solution: Ensure your starter is bubbly and active before using it. Allow the dough to rise until it increases in volume by at least 75% during bulk fermentation. If your dough is overworked, it may lose its ability to trap air bubbles. Keep the handling gentle, especially when shaping.
3. The dough isn’t rising as expected during fermentation.
- Possible cause: Your sourdough starter may not be active enough, or the fermentation environment is too cold.
- Solution: Make sure your starter is well-fed and bubbly before using it. If your kitchen is cold, try placing the dough in a warmer area (e.g., near the oven or on top of the fridge) to encourage better fermentation.
4. The crust is too soft or soggy.
- Possible cause: The bread didn’t bake long enough, or it wasn’t placed on a hot sheet pan.
- Solution: Make sure your oven is fully preheated before baking, and ensure the bread bakes long enough to develop a crisp crust. If the crust still doesn’t crisp up, try baking at a slightly higher temperature (475°F for 10 minutes, followed by 450°F for another 10 minutes).
5. My dough is over-fermented and too sticky.
- Possible cause: The dough has risen too long, either during the bulk fermentation or the resting phase.
- Solution: If you notice the dough is very sticky and has an unpleasant sour smell, it may be over-fermented. Keep an eye on the rise times, and don’t let it sit for too long before moving to the next step.
6. I don’t have a straight-sided vessel for bulk fermentation. What can I do?
- Solution: While a straight-sided vessel makes monitoring dough rise easier, any container with clear volume markings will work. If you don’t have such a vessel, you can place the dough in a large bowl and use a rubber band to mark the starting height, so you can track the dough’s progress.
7. My dough has a too-tight crumb. What went wrong?
- Possible cause: Under-fermentation or not enough hydration.
- Solution: If the crumb is tight and not airy, your dough might not have fermented long enough. Allow the dough more time to rise, and if needed, slightly increase the hydration by adding a bit more water next time.
Frequently Asked Questions
What is ciabatta bread?
Ciabatta is an Italian bread known for its rustic appearance, with a crispy, golden-brown crust and a soft, airy crumb. Its name, meaning "slipper" in Italian, refers to its shape, which resembles a slipper. Typically used for sandwiches, ciabatta has a light and chewy texture, making it perfect for soaking up sauces or enjoying with olive oil.
What makes this sourdough ciabatta recipe "simple"?
This sourdough ciabatta recipe is considered simple because it eliminates the need for complicated steps like autolyse, preferments, or a Dutch oven. With just four ingredients—sourdough starter, bread flour, water, and salt—and a few easy techniques like stretches and folds, this recipe yields an incredible ciabatta without the stress of advanced baking methods.
Do I need a special sourdough starter for this recipe?
No, you don't need a special sourdough starter, but it’s important to use an active, bubbly starter. A healthy starter is crucial for both leavening the dough and providing the tangy flavor that defines sourdough bread. You can either build your starter from scratch or use a reputable store-bought one (like from King Arthur Flour or Breadtopia).
Can I use all-purpose flour instead of bread flour?
While you can use all-purpose flour, bread flour is preferred for ciabatta because of its higher protein content, which helps develop a stronger gluten network. This results in a better structure for the dough and a more open crumb. If you must use all-purpose flour, the texture of your ciabatta might be slightly less airy, but it will still taste great.
What is bulk fermentation and why is it important?
Bulk fermentation is the first rise of the dough after mixing. During this time, the dough ferments, and its flavors and structure develop. Bulk fermentation is key for creating an airy crumb and a tangy flavor in sourdough bread. It’s essential to let the dough rise until it has increased in volume by 75% to 100%, depending on the recipe.
How do I know when the bulk fermentation is complete?
Bulk fermentation is complete when the dough has increased in volume by about 75% to 100%. You can use a straight-sided vessel to track the rise or mark the height of the dough in a bowl with a rubber band. The dough should look puffy and feel airy when you touch it. Be sure not to over-ferment, as this can lead to overly sticky dough.
What are "stretches and folds" and how do I perform them?
"Stretches and folds" is a technique used to develop gluten in the dough without kneading. To perform a stretch and fold, wet your hands and grab one side of the dough. Stretch it upwards and fold it over toward the center. Rotate the bowl a quarter turn and repeat this process. Perform this at 30-minute intervals to help the dough build strength.
Do I need a Dutch oven or baking stone to bake this ciabatta?
No, this simple sourdough ciabatta recipe does not require a Dutch oven or baking stone. A regular sheet pan lined with parchment paper is all you need to bake the ciabatta. The key to a great crust is a high oven temperature at the beginning of baking, followed by a slight temperature reduction to finish the bake.
Why is cold fermentation (refrigeration) recommended?
Cold fermentation helps develop deeper flavors in the bread by slowing down the yeast activity. This process gives the sourdough more time to ferment and improve the texture, resulting in a lighter, airier crumb. Refrigerating the dough also makes it easier to handle and shape, reducing stickiness.
My dough is too sticky. What should I do?
If your dough is too sticky to work with, it could be due to excess water or insufficient flour. Try adding a small amount of flour during the mixing stage, but be careful not to add too much. Ciabatta dough is naturally sticky due to its high hydration, so try to handle it gently and avoid overworking it.
Why is my ciabatta dense and not airy?
A dense ciabatta may be the result of under-fermentation or using an inactive sourdough starter. Be sure to allow enough time for bulk fermentation, and check that your starter is bubbly and active. Overworking the dough or not letting it rest long enough before baking can also contribute to a dense texture.
Can I make baguettes with this ciabatta dough?
Yes! This ciabatta dough can easily be shaped into baguettes. Instead of dividing the dough into 8 portions for rolls, divide it into 2 portions for longer, thinner baguette-shaped loaves. Bake them on a large sheet pan for a crispy, flavorful baguette with that signature ciabatta crumb.
How should I store leftover ciabatta bread?
Store leftover ciabatta at room temperature in a paper bag or a bread box to maintain its crusty exterior. If you plan to keep it longer, slice and freeze it once cooled, then reheat the slices in the oven to refresh the crust.
What are some serving suggestions for sourdough ciabatta?
Ciabatta is perfect for a variety of dishes. You can serve it with soups, stews, or salads, use it for sandwiches or bruschetta, or simply dip it in olive oil and balsamic vinegar. Its light and airy texture also makes it great for sopping up sauces or stews.
Conclusion: Your Journey to Perfect Sourdough Ciabatta
Making Simple Sourdough Ciabatta Bread is not just about following a recipe; it’s about enjoying the process of crafting a delicious, homemade loaf from scratch. With a few simple ingredients and an easy-to-follow approach, you can create a beautiful ciabatta with a light, airy crumb and a crispy, golden crust. Whether you enjoy it fresh from the oven or use it for sandwiches, bruschetta, or alongside a hearty soup, this bread is sure to impress!
By embracing the simplicity of this recipe, you’re not only baking bread—you’re mastering the art of sourdough without the stress. With minimal kneading, no special equipment, and a bit of patience, you’ll end up with a loaf that rivals any bakery’s finest. Plus, the satisfaction of baking it yourself makes it all the more rewarding.
If you’ve tried this recipe, I’d love to hear how it turned out! Leave a comment below with your thoughts and star rating. Don’t forget to share your results on social media with the hashtag #SourdoughCiabatta so others can join in on the fun!
What variations did you try with your ciabatta? Let us know below!
Love Easy, Flavor-Packed Recipes
If you’re enjoying this recipe and want more quick, delicious meals like it, follow us on Facebook and Pinterest for new posts, cooking tips, and behind-the-scenes peeks from my Brooklyn kitchen. We share weekly ideas to make your time in the kitchen easier—and more fun.