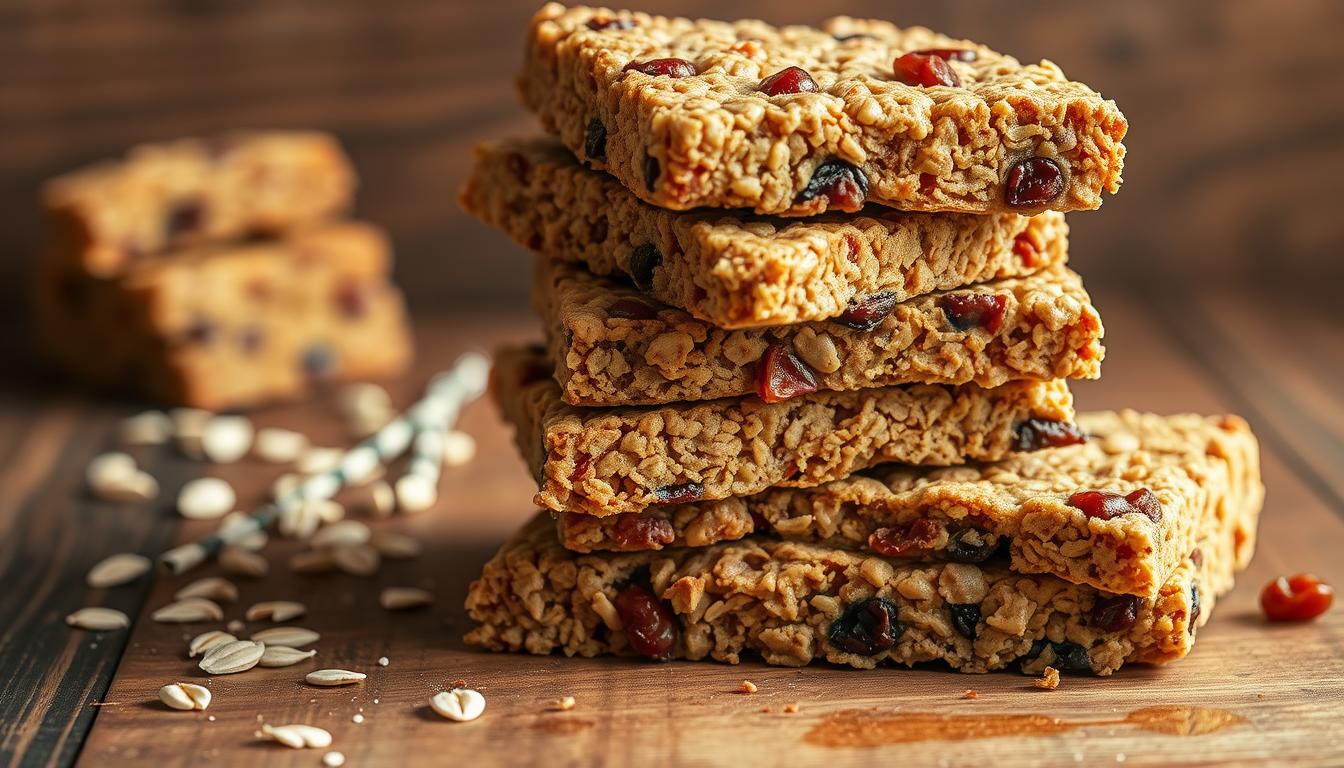
Imagine a snack that’s both satisfying and safe, made just the way you like it. For many, finding the perfect gluten-free treat is a challenge. It’s about balancing taste, nutrition, and convenience. That’s where these homemade gluten-free granola bars come in.
Made with certified gluten-free oats and oat flour, they’re safe for those with Celiac disease. They’re also bursting with flavor. No more settling for store-bought options loaded with sugar or additives. Your kitchen is the best place to take control of what you eat.
These healthy homemade granola bars offer 6g protein per bar. They use natural peanut butter, making every bite a step toward better health.
Table of Contents
Why Make Your Own Homemade Gluten Free Granola Bars
Making simple homemade granola bars is a smart choice. It’s better for your health, saves money, and lets you control what goes into your food. Unlike store-bought bars, you can avoid hidden ingredients.
Health Benefits of Homemade vs. Store-Bought
Commercial best gluten free granola bars often have too much sugar and artificial stuff. Your homemade bars are healthier, with 7g protein and 5g fiber per serving. Add chia seeds, almonds, and dried apricots for extra vitamins and minerals.
Each bite is packed with real nutrition, not empty calories.
- No artificial preservatives or stabilizers
- Up to 50% less added sugar compared to name-brand options
- Option to add omega-3s from flaxseeds or vitamin C from dried citrus
Cost Savings of DIY Granola Bars
A batch of simple homemade granola bars costs about $2 per serving. That’s much cheaper than store brands, which cost $3–$5. Use common ingredients like oats, honey, and peanut butter to save even more.
Making a big batch of 32 bars at once can cut costs even further.
Customization Options for Dietary Needs
Make recipes fit your dietary needs. Swap honey for maple syrup for vegan diets or use sunflower seeds for nut allergies. These best gluten free granola bars can also be keto-friendly with erythritol or soy-free with coconut flakes.
- Gluten-free certified oats ensure safety for celiac diets
- Use coconut oil instead of butter for dairy-free options
- Adjust sweetness with dates or stevia to reduce sugar intake
Essential Ingredients for Gluten Free Granola Bars
Creating the perfect gluten free granola bar recipe begins with the right ingredients. Start with certified gluten-free oats for texture and structure. Brands like Bob’s Red Mill or Gluten Free Oats are good choices to avoid gluten. If you can’t have nuts, sunflower seed butter or almond butter can act as binders.
- Base: Rolled oats (1 ¾ cups), puffed rice (for crunch), or flaxmeal (for oat-free options).
- Binders: Peanut butter, cashew butter, or coconut oil to bind ingredients.
- Sweeteners: Honey, maple syrup, or molasses to balance flavors.
- Add-Ins: Pumpkin seeds, coconut flakes, or dark chocolate chips for texture and taste.
| Ingredient | Role | Substitution Options |
|---|---|---|
| Peanut butter | Binds ingredients, adds protein | Sunflower seed butter, tahini |
| Honey | Sweetens and moistens | Maple syrup, agave nectar |
| Vanilla extract | Enhances flavor | Almond extract, citrus zest |
| Sea salt | Balances sweetness | Flaked salt, Himalayan pink salt |
For easy gluten free granola bars, being precise is key. Use a food processor to grind oats into flour for better structure. Try swapping mini chocolate chips with dried cranberries for a fruity twist. Always check labels for gluten-free certification on oats and baking staples.
This ensures your homemade bars are moist, flavorful, and safe for dietary needs.
Basic Homemade Gluten Free Granola Bars Recipe
Learn to make homemade gluten free granola bars with this easy recipe. They’re great for quick breakfasts or snacks. They’re also perfect for those with dietary restrictions but still taste amazing. Let’s begin!
Required Equipment
- 9-inch x 6-inch baking pan
- Parchment paper
- Rubber spatula
- Mixing bowls
- Rubber spatula
- Food processor (optional)
Step-by-Step Preparation Guide
- Prep the pan: Line it with parchment paper, leaving overhang for easy removal.
- Mix wet ingredients: In a bowl, combine peanut butter, maple syrup, and vanilla until smooth.
- Blend dry ingredients: Stir in oats, flaxseed, nuts, and chocolate chips until dough forms.
- Press firmly: Use the spatula and parchment to pack the mixture tightly into the pan.
- Bake: Bake at 350°F (175°C) for 25 minutes until edges are golden. Cool completely before cutting.
Baking Tips for Perfect Texture
- Press mixture tightly to avoid crumbling.
- Cool fully before slicing for clean edges.
- For no-bake bars, chill mixture at room temperature for 4 hours instead of baking.
Gluten Free Granola Bars Without Oats: Alternative Bases
Homemade granola bars without oats can be made with creative bases. These alternatives are great for those who avoid oats for health reasons. Try these three bases for recipes that stay moist and flavorful:

Quinoa-Based Granola Bars
Quinoa flakes make a protein-rich base with 6g protein and 2g fiber per serving. Cooked or puffed quinoa works well when mixed with honey or maple syrup. Add chopped almonds or coconut flakes for a nutty taste. Use gluten-free certified puffed quinoa for strict diets.
Rice Crisp Variations
Puffed rice, brown rice crisps, or millet flakes create light textures. Mix 1 ¼ cups puffed rice with almond butter and medjool dates for sweetness. Briefly microwave the sweetener mixture to bind. Add shredded coconut or sunflower seeds for chewiness.
Seed and Nut Foundations
Blend seeds (chia, pumpkin) with nuts (walnuts, pecans) for a crunchy base. Use almond butter or sunflower seed butter as a binder. Each bar has 187 calories with 9g healthy fats. Swap puffed millet for rice if you prefer—make sure all ingredients are certified gluten-free.
- Protein-packed options: add chia seeds or pepitas for extra fiber
- Low-FODMAP diets: omit high-FODMAP nuts like almonds
- Storage: Keep bars in the fridge for 1 week; let soften at room temp before eating
These bases are easy to adapt. Try puffed buckwheat or roasted seeds for unique flavors. Always check ingredient certifications to avoid cross-contamination risks.
Creating Chewy Gluten Free Granola Bars
To make gluten free granola bars chewy, start with the right ingredients. Brown rice syrup or honey acts as natural binders. They create sticky compounds that hold the mixture together. Coconut oil and nut butters like peanut butter add fats that stay soft at room temperature.
- Moisture Control: Avoid over-drying mixtures—retain 10-15% moisture by reducing bake time slightly.
- Sweetener Choice: Brown rice syrup or molasses enhance chewiness better than dry sugars.
- Binding Agents: Flax eggs or chia seeds mixed with water add gummy texture without gluten.
| Ingredient | Texture Role |
|---|---|
| Peanut butter | Binds ingredients and adds fat for softness |
| Brown rice syrup | Creates sticky bonds between dry ingredients |
| Coconut oil | Stays semi-liquid at room temp to prevent crunchiness |
Overbaking turns bars dry—check for golden edges but avoid browning centers. Cool completely in the pan before cutting; refrigerating the final mixture can boost moisture retention. Proper storage in airtight containers at room temperature (for 3 days) or the freezer (up to 3 months) preserves chewiness longer. These techniques ensure your gluten free granola bars chewy stay soft and satisfying every time.
Healthy Add-Ins to Boost Nutrition
Make your healthy homemade granola bars even better by adding smart ingredients. These extras not only taste great but also add vitamins, protein, and fiber. Discover how to make your snacks more nutritious without losing flavor.
Superfood Additions
Superfoods like chia seeds and goji berries are full of antioxidants and minerals. Try adding:
| Ingredient | Benefits |
|---|---|
| Chia Seeds | Omega-3s and fiber for digestion support |
| Flaxseeds | Plant-based omega-3s and lignans |
| Goji Berries | Vitamin C and immune support |
Protein-Packed Options
Boost your bars with 20g of protein by adding:
- Whey or plant-based protein powder
- Peanut butter or almond butter for healthy fats
- Sunflower seeds or chopped walnuts
Pair these with rolled oats and honey to keep the texture right.
Natural Sweetener Alternatives
Reduce refined sugar by using:
- Medjool dates (1-2 pieces per batch)
- Applesauce (unsweetened) for moisture
- Monk fruit or coconut sugar for lower glycemic impact
Balance these to get 148 kcal per bar with sugar under 11g. Try dark chocolate chips for antioxidants and pepitas for crunch. Always test small batches to ensure they stick together.
| Per Serving | Amount |
|---|---|
| Protein | 20g |
| Fiber | 2g |
| Total Fat | 8g |
Flavor Variations for Your Homemade Granola Bars
Make your simple homemade granola bars special with these flavor ideas. Try sweet or savory mix-ins to create the best gluten free granola bars you love.
Chocolate and Fruit Combinations
- Dark Chocolate & Coconut: Swap 2 tbsp almond butter for coconut oil, add vanilla, dark chocolate chunks, and shredded coconut.
- Mocha Madness: Stir in espresso powder, cocoa powder, and dried cherries.
- Orange Zest: Mix in dried orange peel, white chocolate chips, and chopped pistachios.
Savory Granola Bar Options
- Rosemary & Sea Salt: Toss in finely chopped rosemary and flaky sea salt with sunflower seeds.
- Curry Crunch: Blend in curry powder, shredded coconut, and roasted cashews.
- Sundried Tomato: Combine dried tomatoes, basil, and nutritional yeast for a cheesy kick.
Seasonal Flavor Inspirations
| Season | Flavor | Ingredients |
|---|---|---|
| Spring | Lemon Poppyseed | Zest of 1 lemon, poppyseeds, dried blueberries |
| Summer | Tropical Mango | Shredded coconut, dried mango, lime juice |
| Autumn | Pumpkin Spice | Pumpkin puree, cinnamon, ginger, and dried apples |
| Winter | Peppermint | White chocolate chips, crushed candy canes, and crushed peppermint leaves |
Use ¼ cup mix-ins per batch to prevent crumbling. Chill bars 30 minutes after baking. These best gluten free granola bars are perfect for breakfast or snacks.
Best Storage Methods for Homemade Granola Bars
Storing homemade gluten free granola bars right keeps them fresh and intact. Let the mixture cool in the pan for at least an hour before cutting. This helps prevent crumbling. After cutting, follow these tips to keep your snacks fresh and safe.

| Storage Method | Max Time | Notes |
|---|---|---|
| Airtight Container (Room Temp) | 3–10 Days | Store in a cool, dry area. Avoid humidity. |
| Refrigerator | Up to 1 Week | Separate layers with parchment paper to prevent sticking. |
| Freezer | 3 Months | Wrap each bar in foil or plastic before freezing for long-term storage. |
- Always use airtight containers to lock in freshness.
- Freeze individual bars for easy grab-and-go snacking.
- Thaw frozen bars in the fridge overnight for best texture.
To keep your gluten free granola bar recipe at its best, follow these steps. Room-temperature storage is best in dry places. Freezing extends shelf life. Check containers weekly for moisture or spoilage signs like mold or soft spots. Adjust storage if your recipe uses high-moisture ingredients like dates or honey.
Conclusion: Enjoying Your Homemade Gluten Free Treats
Homemade gluten-free granola bars are great for any lifestyle. They let you avoid additives and control what goes into them. This makes them perfect for your dietary needs.
These bars are great for busy days. They have 254 calories, 6g protein, and 3g fiber per serving. This keeps you full without sacrificing taste.
You can make them your own by using gluten-free oats, quinoa flakes, or seeds. Quinoa adds important amino acids. Nuts and dark chocolate add flavor and nutrition.
Keep them fresh in an airtight container for up to 10 days in the fridge or freeze for a month. They’re quick to make, perfect for breakfast, a snack, or dessert.
Try adding chia seeds or dried fruit for new flavors. If the texture isn’t right, adjust the binding agents or baking time. Start simple and then add your own twist.
With just peanut butter and gluten-free oats, you can make healthy snacks. Each bite is full of heart-healthy fats, fiber, and protein. Start with the basics and let your creativity shine.