
Korean rice cake recipe—it’s more than just a dish; it’s a tradition that connects generations and brings comfort with every bite. When I first attempted this Korean rice cake recipe, I wasn’t just following instructions—I was chasing a feeling. A memory. I grew up watching my mom turn humble ingredients into magic, and years later, in my Brooklyn apartment with Charlie curled at my feet, I found myself craving something soft, chewy, and grounding.
That’s how this Korean rice cake recipe became part of my kitchen rhythm. I had tasted garaetteok in tteokbokki from local Korean spots, but nothing compared to the satisfaction of making it at home—mixing the rice flour, steaming or microwaving it, kneading the hot dough, and rolling those glossy white cylinders by hand. It brought the same joy I used to feel rolling out sugar cookies with my mom, except now it was rice cakes and sesame oil.
If you’re new to Korean cooking, don’t worry. This recipe is flexible, beginner-friendly, and so rewarding. Whether you use a steamer or microwave, you’ll end up with a beautifully elastic base for toppoki (tteokbokki), tteokguk, or your own fusion creation. And it all starts here—with a Korean rice cake recipe you’ll want to make again and again.
Table of Contents
Why I Love This Korean Rice Cake Recipe
Homemade comfort with chewy perfection
There’s something deeply comforting about this Korean rice cake recipe. Maybe it’s the way the dough turns silky under your hands after kneading, or how each slice feels like a blank canvas ready for bold flavors. For me, this recipe brought warmth to a cold Brooklyn afternoon—the kind where I crank up my favorite playlist, roll up my sleeves, and let the rhythm of rice and steam guide the day.
The first time I made this Korean rice cake recipe, I expected it to be tricky. But the ingredients are simple—rice flour, salt, and hot water—and the steps become second nature fast. I experimented with both the microwave and steamer methods, and each gave me those chewy, shiny cylinders I remembered from my first bite of tteokbokki (also called toboki). That unmistakable snap when biting into freshly made garaetteok makes it all worth it.
What I love most is how adaptable the rice cakes are. They soak up spice in toppoki, shine in clear tteokguk broth, or even crisp up in a pan like a Korean rice cracker. I’ve even paired them with this cucumber tuna salad for a light, fusion-inspired lunch.
This Korean rice cake recipe isn’t just a dish—it’s a tool, a memory-maker, and a delicious way to bring people together.
Korean Rice Cake Recipe: Easy Garaetteok for Tteokbokki & More
- Total Time: 35 minutes
- Yield: 4 servings 1x
Description
Learn how to make garaetteok, the classic Korean rice cake recipe, at home using either a microwave or steamer. Perfect for tteokbokki, tteokguk, and stir-fries.
Ingredients
- 2 cups wet-milled rice flour (300g)
- 1 Tbsp cornstarch
- 1 tsp fine salt
- 3/4 cups boiling water (for microwave version)
- 2/3 cups boiling water (for steamer version)
- 1/2 tsp sesame oil
Instructions
- Rinse and soak 2.5 cups of rice overnight, drain, air dry, and grind into powder.

- Sift rice flour twice and set aside.
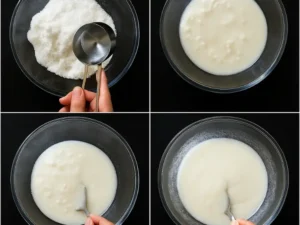
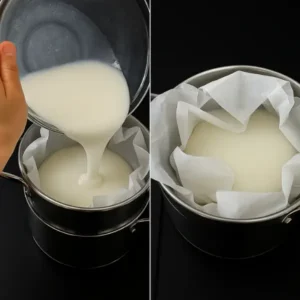
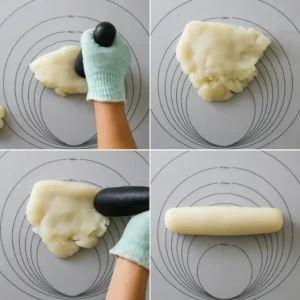
- For microwave method: Mix flour, salt, and water in stages; microwave in bursts and stir; knead hot dough and shape into cylinders.
- For steamer method: Combine ingredients, steam for 20 minutes, knead, and shape into cylinders.
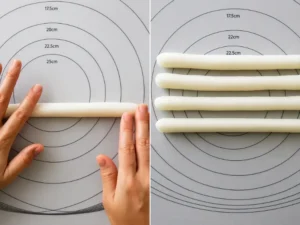
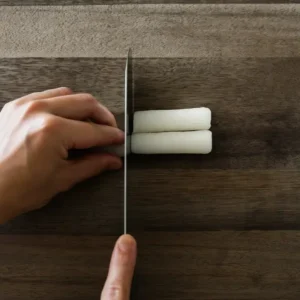
- For tteokbokki: Roll into 1–1.5 cm thick logs, cut into 6 cm pieces.
- For tteokguk: Roll into 2–3 cm logs, chill, and slice diagonally.

- Lightly coat in sesame oil to prevent sticking.
- Store in fridge (3 days) or freeze for later use.
Notes
Use wet-milled rice flour for best texture.
Microwave version is quicker but slightly denser than steamed.
Pair with spicy sauce, clear broth, or pan-fry for crispy texture.
Freezes well—reheat by steaming or pan-frying.
- Prep Time: 10 minutes
- Cook Time: 25 minutes
- Category: Snacks
- Method: Steam or Microwave
- Cuisine: Korean
Nutrition
- Serving Size: 1 portion
- Calories: 305
- Sugar: 1g
- Sodium: 586mg
- Fat: 2g
- Saturated Fat: 1g
- Unsaturated Fat: 1g
- Trans Fat: 0g
- Carbohydrates: 66g
- Fiber: 2g
- Protein: 5g
- Cholesterol: 0mg
How to Make This Korean Rice Cake Recipe Step-by-Step
Start with homemade rice flour (or store-bought if you’re short on time)
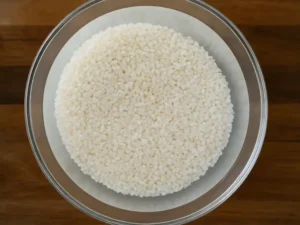
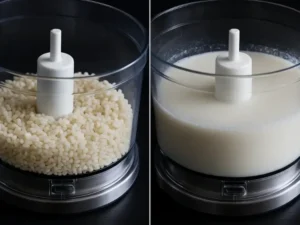
At the heart of any Korean rice cake recipe is rice flour—and for the best texture, wet-milled flour is key. It might sound intimidating, but it’s just soaked rice finely ground in a food processor. If you’re the kind of home cook who loves a project (like I do!), making your own rice flour adds depth and freshness to your final result.
To make it, rinse short or medium grain rice (like sushi rice) until the water runs clear. Soak overnight, then air-dry for about an hour. Grind it down into a soft powder—this will give your Korean rice cake recipe that signature chewy bite. If you’d rather use store-bought flour, go for wet-milled rice flour from an Asian market for the closest result.
Microwave vs. Steamer: Two Easy Methods
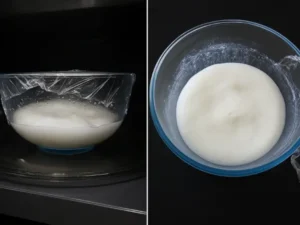
This recipe gives you two cooking options. For a faster version, the microwave method is surprisingly effective. Mix rice flour, cornstarch, salt, and boiling water in stages. Microwave in bursts, stirring in between, until you have a soft, cooked dough. For a more traditional touch, the steamer method involves placing the mixture in a lined steamer and cooking over high heat for about 20 minutes.
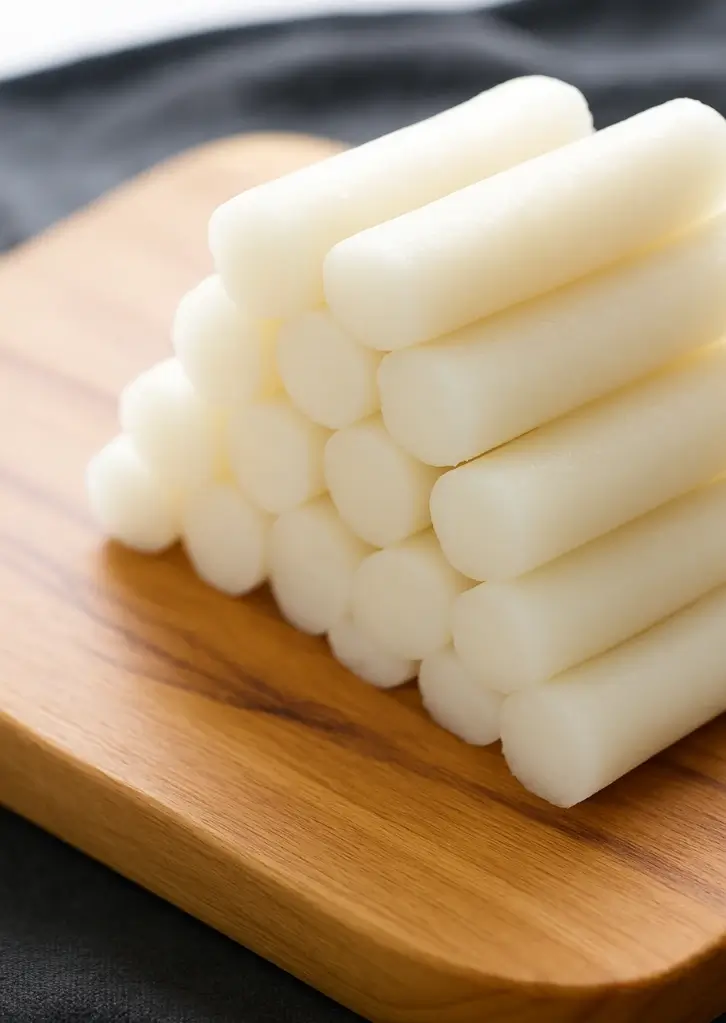
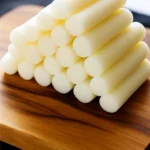
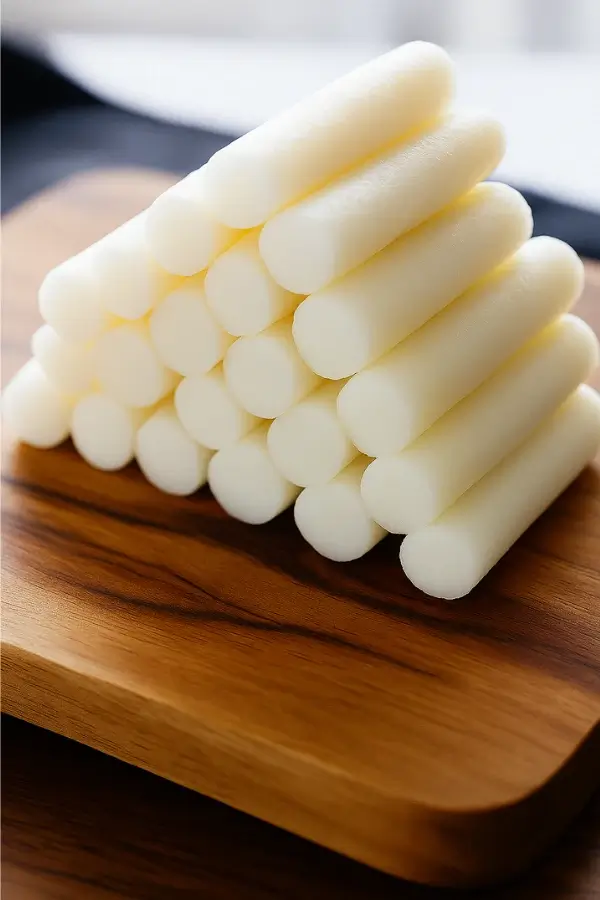
Once hot and elastic, wear heat-safe gloves and knead the dough on a cling-wrapped board. You’ll pound and shape it into smooth, glossy cylinders.
Cut and shape for your dish
For tteokbokki, roll the dough into 1–1.5 cm thick ropes, then slice into 6 cm pieces. For tteokguk, make them thicker and chill before slicing diagonally. The result? Perfectly shaped rice cakes ready to soak up sauce or broth.
If you’re meal prepping, pair a batch of fresh rice cakes with this Korean carrot salad for a vibrant, make-ahead lunch or dinner.
How to Serve This Korean Rice Cake Recipe
Use your rice cakes in traditional or modern dishes
What makes this Korean rice cake recipe so satisfying is how easy it is to adapt once you’ve shaped the dough. These rice cakes, known as garaetteok, are the base for so many well-loved Korean meals—and once you’ve made them from scratch, you’ll never reach for the store-bought version again.
For a spicy kick, try using them in tteokbokki (sometimes spelled topokki or toboki). The chewy texture of homemade rice cakes holds up beautifully in the sweet and spicy gochujang sauce. Toss them with scallions, fish cakes, and a jammy egg, and you’ve got a street food favorite that tastes even better at home.
Prefer something lighter? Thinly sliced rice cakes are a must in tteokguk, the clear, savory soup served during Korean New Year. This version of the Korean rice cake recipe brings comfort and symbolism—each oval slice representing prosperity for the year ahead.
You can also pan-fry the rice cakes in a little oil until they’re golden and crispy on the outside. I love serving them this way with a tangy carrot ribbon salad for a light lunch. For something sweet to end the meal, pair them with a slice of pineapple upside down cake and some fruit for a creative fusion dessert plate.
This Korean rice cake recipe isn’t just a foundation for traditional meals—it’s an invitation to get creative with textures and flavors.
Variations and How to Store Your Korean Rice Cake Recipe
Customize it to your needs and keep it fresh longer
One of the best things about this Korean rice cake recipe is how adaptable it is. Whether you prefer a firmer texture, want to try a gluten-free twist, or are prepping for the week ahead, this base dough can be shaped to suit your kitchen and your schedule.
For starters, the method you choose—microwave or steamer—affects the final texture. The microwave version tends to be slightly denser, while the steamer yields a softer, pillowy bite. Both are great, so choose based on your mood (or your time). If you like experimenting with texture like I do, you might enjoy serving rice cakes crisped up with a dipping sauce and a side of air fryer veggie chips for contrast.
Want to use your rice cakes in creative ways? Try slicing thinner and frying them until golden to make homemade Korean rice crackers. Or roll them thick and cut into squares for a savory stir-fry. You can even turn them into dessert with a light syrup drizzle and toasted sesame seeds.
As for storage, fresh rice cakes dry out quickly, so it’s best to use them the same day if possible. But don’t worry—your hard work won’t go to waste. To store them, coat lightly with sesame oil and wrap tightly in cling film. Refrigerate for up to 2–3 days, or freeze them in an airtight container for longer. Just thaw and reheat gently by steaming or pan-frying.
Thanks to this Korean rice cake recipe, you’ll always have a versatile base ready to go—whether you’re cooking for comfort, celebration, or pure curiosity.
Frequently Asked Questions
How do you make garaetteok at home?
To make garaetteok at home, you’ll need wet-milled rice flour, salt, and boiling water. Mix the ingredients and cook the dough using either the steamer or microwave method from this Korean rice cake recipe, then knead and roll it into cylinder shapes.
What ingredients are needed to make garaetteok?
The base ingredients for garaetteok are short or medium-grain rice flour, salt, and water. Cornstarch and sesame oil are also used in this Korean rice cake recipe to improve texture and prevent sticking during shaping and storage.
How do you use garaetteok in cooking?
Garaetteok can be sliced and added to tteokbokki (spicy stir-fry rice cakes), tteokguk (rice cake soup), pan-fried for crispy edges, or even included in savory stir-fries. This Korean rice cake recipe gives you a base you can serve in many creative dishes.
How should you store freshly made garaetteok?
Coat the rice cakes in sesame oil, wrap tightly, and refrigerate for up to 3 days. For longer storage, freeze them in airtight containers. Reheat by steaming or frying—just as covered in the storage section of this Korean rice cake recipe.
What is Korean rice cake made of?
Korean rice cakes are typically made from finely ground short or medium-grain rice, water, and salt. Some variations use glutinous rice or incorporate other ingredients for sweetness or color.
How to make easy Korean rice cakes?
Follow a simplified method using the microwave version of this Korean rice cake recipe. It cuts down cooking time while still delivering chewy, elastic rice cakes perfect for everyday meals.
Are rice cakes Korean healthy?
Yes, Korean rice cakes are naturally gluten-free and low in fat. They provide clean, complex carbs but should be enjoyed in moderation, especially in rich dishes like tteokbokki.
Do Korean rice cakes need to be soaked?
Only if they’re pre-made and frozen. Freshly made rice cakes from this recipe don’t require soaking. If your rice cakes are hard or dry, a quick soak or steam will soften them up.
Conclusion
If you’ve made it this far, you now have everything you need to master the art of garaetteok with this Korean rice cake recipe. Whether you steamed the dough the traditional way or went for the quicker microwave method, the result is the same: chewy, tender rice cakes that are the perfect base for your favorite Korean dishes.
Making these rice cakes from scratch isn’t just about the food—it’s about the process. There’s something grounding and joyful about shaping dough with your hands, especially when it turns into something as versatile and satisfying as garaetteok. From spicy tteokbokki to comforting tteokguk, or even served crispy alongside something fun like our quick and easy desserts, your rice cakes are ready to shine.
I hope this recipe gives you the confidence to keep exploring new flavors and traditions in your kitchen. As always, keep it easy, keep it peasy, and don’t be afraid to get your hands a little sticky—it’s worth it.
Love Easy, Flavor-Packed Recipes
If you’re enjoying this recipe and want more quick, delicious meals like it, follow us on Facebook and Pinterest for new posts, cooking tips, and behind-the-scenes peeks from my Brooklyn kitchen. We share weekly ideas to make your time in the kitchen easier—and more fun.